This series of posts is intended to assist in learning how to use Terraform with Azure – we will walk through a full deployment, covering off each step and all elements within the code. Within this series of posts I will walk through the following steps, breaking down the installation and Terraform code step-by-step to give an overview:
Part 1: (Click here for Part 1)
- Installation of Terraform, VSCode and other tooling using Chocolatey
- Setup of the Terraform files and AzureRM provider
- Creation of the Variables including terraform.tfvars and variables.tf
- Setup of our deployment file for Azure Resources – in this case, it will be a single azuredeploy.tf file.
Part 2: (Click here for Part 2)
- Planning for our Deployment
- Deployment of the Terraform
- Testing
- Destroy all the things! (Cleaning up and destroying the Resources after they have been deployed).
Part 3:
- Tips, Tricks, and taking further steps
Note: to follow this series of posts through to deployment, you will need an Azure Subscription that you can deploy Resources into.
Tips, Tricks and taking further steps…
To help continue learning with Terraform, and in particular using it with Azure, I’ve put together the following recommendations and further reading/activities. The below is by no means exhaustive, and there are many ways you can continue developing in this area. The below is really just intended as a mixture of additional learning areas and pointers that I hope will help! 🙂
Trying out other Environments:
During Posts 1 and 2 from this series, we focussed on getting setup and deploying only two simple Resources (a Resource Group and a VNET). However, you’ll obviously want to expand on this and develop larger and more complex environments. To get started, a great place to learn is from other people’s code – as this gives the opportunity to see how they have created Resources and developed their Terraform, and allows you to deploy more complex environments without having to write the code first. This is a great way to learn from others and allows you to reuse code in your own environment. I’ve created a few sample environments that can be deployed using the method’s outlined in Post 1 and 2 (just download the files, open in VS Code, login to Azure, initialise & deploy):
- Single Region Azure Baselab – this creates a simple Azure environment as shown in the diagram below:

- Dual Region Azure Baselab – this creates an environment like the Single Region Baselab, but spans across two Azure Regions:

As well as these, I have also created a number of other small environments that are available within my GitHub Repo:
- Azure Firewall DemoLab – This Lab sets up a simple environment to demonstrate Azure Firewall.
- Web Server IIS DemoLab – This Lab sets up a simple environment (based on the Base Lab environments above) and uses a Custom Script Extension to install IIS.
Develop your own Environments:
Developing your own environments is a great way to learn, and fortunately when working with Terraform for Azure, the Terraform Registry is awesome! The Registry shows us all of the documentation for the AzureRM provider, allowing us to find the right code for each type of resource that we want to deploy. Using the Registry is very simple and each type of Resource is searchable, and example code is provided allowing you the use this as the starting point for creating your own environment. An example with a Windows Virtual Machine is shown below:
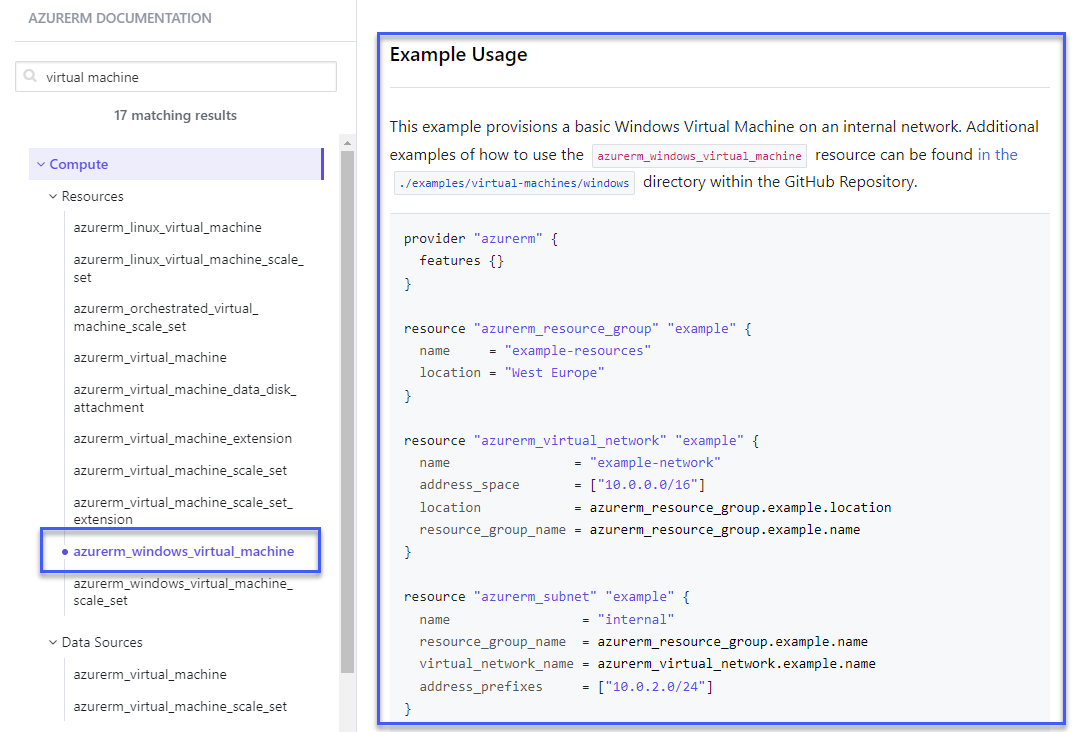
As a tip for this step – also remember to install the VS Code extension for Terraform, this helps hugely with Syntax Highlighting, IntelliSense and more 🙂 https://marketplace.visualstudio.com/items?itemName=hashicorp.terraform
Set yourself a challenge – or ask for one!:
Setting yourself a challenge to build an environment is a great way to learn, particularly if it’s something outside of your comfort zone. For example, taking a set of requirements, technical deliverables or a new Azure Service, and creating an environment to deliver them. Another great way is to ask for a challenge – get a friend or colleague to create a scenario or list some Resources or Objectives to achieve.
If you’d like a challenge setting please reach out via my Contact Form or Twitter! Be warned – I’ll set something tricky! 😉👾
In the meantime, here’s a few starter challenges to try out:
- Create a new Hub and Spoke Topology with VNET Peering, in an Azure Region of your choosing, and then prove you can ping between resources in the VNETs.
- Create and peer two VNETs, and then create a Network Security Group to prevent communication between VMs on those VNETs.
- Create a new Management Group, and create an Azure Policy linked to this Management Group that prevents deployment to an Azure Region of your choice.
Learn to build Security in to your code development:
As you develop on your journey using Terraform and begin using it in more than just development and lab environments, the need for security becomes ever more important. With this in mind, there are a number of specific tools you can use to scan your code for potential misconfigurations, and remediate these before any environment is even created. Code scanning toolsets are fairly widespread, and there are both commercial and free services you can utilise. Many of these toolsets can also be integrated into DevOps pipelines and deployments where required too, so that automated scanning can be put in place.
A great place to start is using tfsec, which is an Open Source Project from Aqua Security. This tooling allows you to scan your code and then deal with any issues highlighted. To get started, you can install tfsec using chocolatey:
choco install tfsec
Once installed, you can then analyse code right within VSCode – just by typing “tfsec” into the command line. Once tfsec has completed it’s scanning, you will see an output like the below:
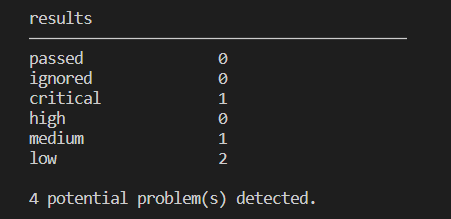
Each of the detected problems are also provided with a Link to explain the identified problem:

As you can see, this is a great way to build in security scanning to your code, and remediate issues both before and after resources are created within Azure. tfsec can also be integrated easily in CI/CD Pipelines – I’ve previously blogged about using it for scanning with GitHub Actions: https://jakewalsh.co.uk/securing-your-deployment-with-scanning-using-github-actions/
Bring on the DevOps Tooling!:
Once you are comfortable using Terraform locally on your device, you can begin to switch to utilising DevOps tooling to manage and deploy your code. There are a wealth of toolsets available for many different platforms, across many different providers. For myself, the two I use most regularly with Azure and Terraform are Azure DevOps and GitHub.
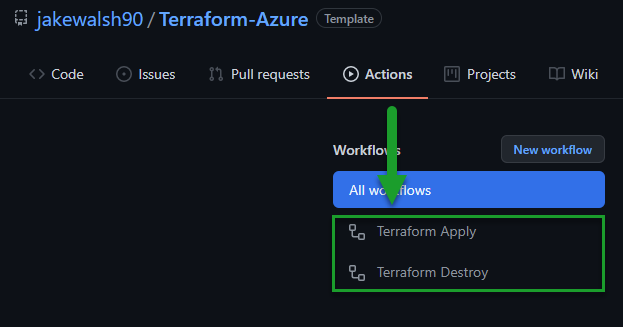
To get started I would recommend following my guide for GitHub Actions Azure Terraform deployment – this will walk you through the following steps:
-
Setting up a Repository for the Code
-
Creating the required Service Principal to authenticate to Azure
-
Configuring a Terraform Backend
-
Configuring Repository Secrets
-
Setting up GitHub Actions
-
Running the deployment using GitHub Actions
To continue learning within this area, I would recommend checking out the following links:
- https://thomasthornton.cloud/2020/07/08/deploy-terraform-using-azure-devops/
- https://devopswithdave.com/deploy-terraform-on-azure/
- https://docs.microsoft.com/en-us/azure/devops/demo-gen/use-demo-generator-v2?view=azure-devops – Check out the Terraform Demo!
Continuing your journey:
Continuing your journey with Terraform will likely take you beyond AzureRM, and into deployment across other Azure Services, other Cloud providers and even integrating additional tooling.

It’s hard to pull together a comprehensive list here as it would be an almost endless list – so I’ve included links to a few additional providers, and tooling that I use regularly:
- https://registry.terraform.io/providers/hashicorp/azuread/latest – Azure AD Terraform Provider – this allows you to interact with Azure AD using Terraform and work with elements like Users, Groups and Service Principals. I’ve found this extremely useful when deploying Azure environments!
- https://registry.terraform.io/providers/hashicorp/aws/latest – AWS Terraform Provider
- https://registry.terraform.io/providers/hashicorp/google/latest – Google Cloud Platform Terraform Provider
- https://registry.terraform.io/browse/modules – Terraform Registry List of Modules
- https://learn.hashicorp.com/terraform – HashiCorp Learn Website for Terraform – this is awesome!
This is the last post in my Simple Terraform Walkthrough Series – I hope this has been useful, more posts coming soon! 😆